After sticking with Phaser 2 (CE) for a while finally I decided to jump onto Phaser 3 (ver 3.15.1). Though there is still some work going on such as Scale Manager which is not released yet but the api seems to have grown and stablized with plenty of documentation available now. We are going to write a game while we explore this deeper. Let us write classic game of Peg Solitaire which is also known as just “Solitaire” in England and Brainvita in “India”.
First we are going to create an html file (index.html) with following content
<html>
    <head>
        <title>Peg Solitaire</title>
        <meta http-equiv="Content-type" content="text/html; charset=utf-8">
        <meta name="viewport" content="width=device-width, minimum-scale=1, initial-scale=1, user-scalable=no">

        <script src="js/phaser.min.js"></script>
    </head>
    <body>
        <script src="js/game.js"></script>
    </body>
</html>
html file includes phaser js and our game code (game.js) which is placed in js folder. Let us start with the basic one screen setup as following
let loadGame = function () {

    let config = {
        type: Phaser.AUTO,
        width: 500,
        height: 500,
        backgroundColor: 0x000000,
        scene: TheGame
    }

    let game = new Phaser.Game(config);
};

if (document.readyState === "complete" || (document.readyState !== "loading" && !document.documentElement.doScroll)) {
    loadGame();
} else {
    document.addEventListener("DOMContentLoaded", loadGame);
}

class TheGame extends Phaser.Scene {

    constructor() {
        super("TheGame");
    }

    preload() {
    }

    create() {
    }
}
If you are coming from Phaser 2 then you would notice some differences. We are starting a game and passing a config which defines the type (similar to Phaser 2; AUTO, WEBGAL, CANVAS), width and height of the game, backgroundColor and one scene. We have a skeleton scene which is not doing anything at the moment. We will add code to this as we move forward. In Phaser 2 we has the concept of states where we could define multiple states and then load one state at a time. We could move between states such as a menu screen, game screen, game over screen. Scenes are something similar but highly advanced now. In Phaser 2 we could only load one state a time but now in Phaser 3 we can have multiple scenes running in parallel. We can move from one scene to another or run multiple screens at the same time. Scenes can overlay each other or can be placed adjacent to each other and all we have to do is to change the camera position to move from once scene to another. Scenes are much powerful now since they are now self-contained games in their own right with all game objects such as input, camera, tweens etc available to them. Scenes are managed by The Scene Manager but we would never need to access anything via The Scene Manager. Everything a game requires would be available inside scene itself.
Read all about scenes in the Phaser 3 devlogs here and here. Its a must read.
The work so far gives us a screen as following

Now let us center align our game in the html. Add following style to canvas element
canvas{
    display:block;
    margin: 0;
    position: absolute;
    top: 50%;
    left: 50%;
    transform: translate(-50%, -50%);
}
We will add this class in css file and load the css in html. Now we have an app.css file in css folder as following
body {
    padding: 0px;
    margin: 0px;
    background: #000;
    overflow-x: hidden;
	font-family:cursive;
}
canvas{
    display:block;
    margin: 0;
    position: absolute;
    top: 50%;
    left: 50%;
    transform: translate(-50%, -50%);
}
html file is changed to
<html>
    <head>
        <title>Peg Solitaire</title>
        <meta http-equiv="Content-type" content="text/html; charset=utf-8">
        <meta name="viewport" content="width=device-width, minimum-scale=1, initial-scale=1, user-scalable=no">
        <link rel="stylesheet" href="css/app.css">

        <script src="js/phaser.min.js"></script>
    </head>
    <body>
        <script src="js/game.js"></script>
    </body>
</html>
Also changed the background color of the game so now our empty game looks like following
We are going to create an english board. First we need to import a spritesheet which contains the images we are going to use in this game. I have a simple 3 image spritesheet as following

We will import the spritesheet in preload method
    preload() {
        this.load.spritesheet("pegs", "images/pegs.png", {
            frameWidth: 60,
            frameHeight: 60
        });
    }
Now we are going to draw the board
class TheGame extends Phaser.Scene {

    constructor() {
        super("TheGame");
    }

    preload() {
        this.load.spritesheet("pegs", "images/pegs.png", {
            frameWidth: 60,
            frameHeight: 60
        });
    }

    create() {
        this.boardDef = [
            [-1, -1, 1, 1, 1, -1, -1],
            [-1, -1, 1, 1, 1, -1, -1],
            [1, 1, 1, 1, 1, 1, 1],
            [1, 1, 1, 0, 1, 1, 1],
            [1, 1, 1, 1, 1, 1, 1],
            [-1, -1, 1, 1, 1, -1, -1],
            [-1, -1, 1, 1, 1, -1, -1]
        ];

        // add our sprites
        this.board = [];
        this.selectedPeg = null;

        for (let i = 0, len = this.boardDef.length; i < len; i++) {
            let r = this.boardDef[i];
            let row = [];
            this.board.push(row);
            for (let j = 0, cnt = r.length; j < cnt; j++) {
                let c = r[j];
                if (c >= 0) {
                    let cell = this.add.image(30 + i * 60, 30 + j * 60, "pegs");
                    cell.setFrame(c > 0 ? 1 : 0);
                    cell.setOrigin(0);
                    row.push(cell);
                } else {
                    row.push(null);
                }
            }
        }
    }

    clickPeg(peg) {
    }
}
Now we have drawn the board as following
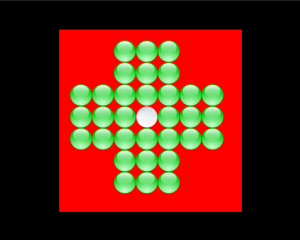
In this code we have added the images to their positions. The game play can be done by simply changing the frame according to the rules. No heavy processing or complex logic is required in the game (unless we want to add automatic solver for the game).
One important change in Phaser 3 from Phaser 2 is that all images or sprites are by default positioned from center (in Phaser 2 this started from top left corner) so if we want to change it to top left corner then we can use setOrigin method and set it to 0.
Now let us simply add some event and game code
class TheGame extends Phaser.Scene {

    constructor() {
        super("TheGame");
    }

    preload() {
        this.load.spritesheet("pegs", "images/pegs.png", {
            frameWidth: 60,
            frameHeight: 60
        });
    }

    create() {
        this.boardDef = [
            [-1, -1, 1, 1, 1, -1, -1],
            [-1, -1, 1, 1, 1, -1, -1],
            [1, 1, 1, 1, 1, 1, 1],
            [1, 1, 1, 0, 1, 1, 1],
            [1, 1, 1, 1, 1, 1, 1],
            [-1, -1, 1, 1, 1, -1, -1],
            [-1, -1, 1, 1, 1, -1, -1]
        ];

        //  If a Game Object is clicked on, this event is fired.
        //  We can use it to emit the 'clicked' event on the game object itself.
        this.input.on('gameobjectup', function (pointer, gameObject) {
            gameObject.emit('clicked', gameObject);
        }, this);

        // add our sprites
        this.board = [];
        this.selectedPeg = null;

        for (let i = 0, len = this.boardDef.length; i < len; i++) {
            let r = this.boardDef[i];
            let row = [];
            this.board.push(row);
            for (let j = 0, cnt = r.length; j < cnt; j++) {
                let c = r[j];
                if (c >= 0) {
                    let cell = this.add.image(30 + i * 60, 30 + j * 60, "pegs");
                    cell.setFrame(c > 0 ? 1 : 0);
                    cell.setOrigin(0);

                    // enable input events
                    cell.setInteractive();
                    cell.on('clicked', this.clickPeg, this);
                    cell.gridX = i;
                    cell.gridY = j;
                    row.push(cell);
                } else {
                    row.push(null);
                }
            }
        }
    }

    clickPeg(peg) {
        if (peg.frame.name === 0) {
            // if we have not selected a peg to jump then no need to move any further
            if (!this.selectedPeg)
                return;

            let clickedX = peg.gridX;
            let clickedY = peg.gridY;
            let selectedX = this.selectedPeg.gridX;
            let selectedY = this.selectedPeg.gridY;

            if ((clickedX + 2 === selectedX || clickedX - 2 === selectedX) && clickedY === selectedY) {
                // move horizontal
                let pegToRemove = this.board[(selectedX + clickedX) / 2][clickedY];
                if (pegToRemove.frame.name === 0)
                    return;

                pegToRemove.setFrame(0);
                peg.setFrame(1);
                this.selectedPeg.setFrame(0);
                this.selectedPeg = null;

            } else if ((clickedY + 2 === selectedY || clickedY - 2 === selectedY) && clickedX === selectedX) {
                // move vertical
                let pegToRemove = this.board[clickedX][(selectedY + clickedY) / 2];
                if (pegToRemove.frame.name === 0)
                    return;

                pegToRemove.setFrame(0);
                peg.setFrame(1);
                this.selectedPeg.setFrame(0);
                this.selectedPeg = null;
            }

        } else {
            if (this.selectedPeg) {
                if (peg === this.selectedPeg) {
                    peg.setFrame(1);
                    this.selectedPeg = null;
                } else {
                    this.selectedPeg.setFrame(1);
                    this.selectedPeg = peg;
                    peg.setFrame(2);
                }
            } else {
                this.selectedPeg = peg;
                peg.setFrame(2);
            }
        }
    }
}
Now we have a working Peg Solitaire game in about 100 lines of code. I have highlighted the code used for adding the event which was taken right out of the example on Phaser 3 demo site. You can try the code at work below
What is next:
The game does not display any message on game over so in next part we are going to add another scene which in turn let us make use of multiple scenes in the game. We would also like to add some animations to the game when pegs are jumped. I also think that games should be written with responsive in mind so in next part we would explore the responsive behaviour in Phaser 3. In fact Scale Manager is round the corner with next release so we can explore that as well once it is out.