Crypt-LE implements the functionality to call Let’s Encrypt’s API and generate free SSL certificates for your domains. It can also be used to generate private RSA/ECC keys and Certificate Signing Requests without having a need to use openssl command line tool and the good thing is that it does not need you to install anything on your system. For Windows we can just download and unzip the latest release of the client and unzip it to a folder. You can read other details about this tool on its github page.
Now let us simply jump to the action which is pretty straightforward. Unzipping windows setup gives us le64.exe file which we can run from a command prompt without any need of administrator priviledges on the system. Run command prompt and then go to the folder where le64.exe utility exists. You can also add path of this utility in widows system PATH so that this utlity can be run from any folder. We are going to run following command from the command prompt
le64.exe --email "test@gmail.com" --key account.key --csr domain.csr --csr-key domain.key --crt domain.crt --domains "netexl.com, www.netexl.com" -export-pfx testpassword --generate-missing --handle-as http --liveChange email and domains in the command. This will look for account.key, domain.csr and domain.key in your current folder. If it is not found, then it will be created. For this we have added –generate-missing switch in the command. The first time we run this utility, we need to prove ownership of the domain as well and it can be done using http file upload method or, dns verification method. We will use http method by adding –handle-as http switch to the command. Also, if you want to test the utility first, then we need to remove –live from the command, which will then generate certificates from a test server. For production/live sites, you need to use –live in the command. Now run the command
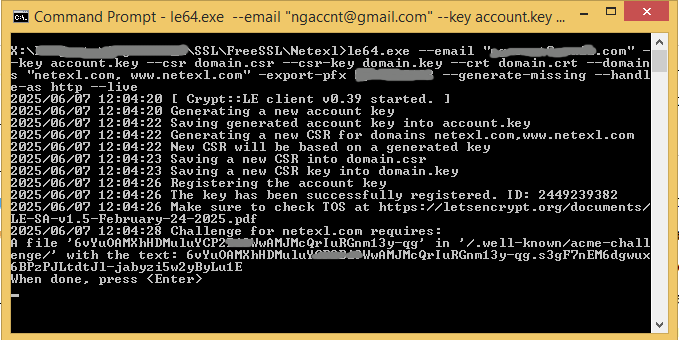
You will notice that it is asking to create a file and upload it to our web server in “/.well-known/acme-challenge” folder which we will do and then hit enter in the command prompt. It also created follwing files in our system

After uploading the file to your web server and hitting enter in the command prompt, it validates the file and then gives you another file, if there are more than one domains specified in the domains switch. Upload all files one by one to your web server and hit enter to validate. After validating the domain’s ownership, this utility wil request a certificate from Let’s Encrypt and download the certificates on your system as following
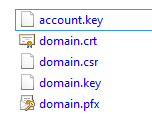
Now we have domain.crt certificate file for our domain.
Now we need to login to “GoDaddy Plesk Admin” where we are going to install these certificates.
Go to “Websites and Domains” -> “SSL/TLS Certificates” under your domain -> Add SSL/TLS Certificates
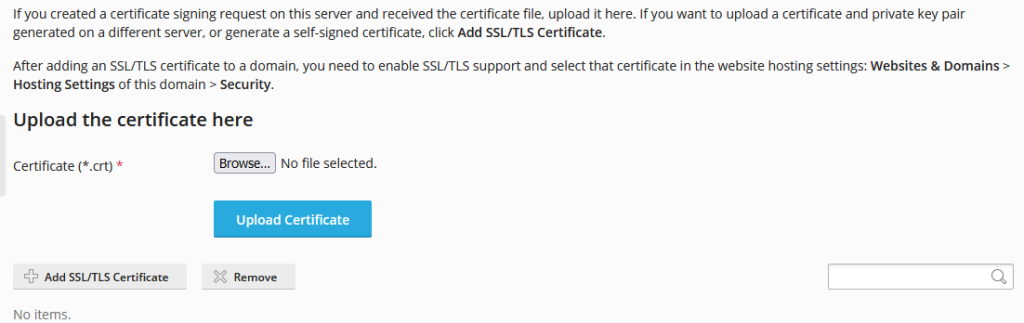
Clicking “Add SSL/TLS Certificate” here will take us to a form where we need to fill some details and upload certificates.
There are two options to upload certificates. One is to upload the files and second one is to copy the content of the certificate files as text. We will upload certificate files in text format here.
Open domain.key file in a text editor and copy its content. This needs to be pasted in the “Private key” box here. Similarly open domain.crt file in a text editor and copy first section in the “Certificate” box and second section in the “CA certificate” box. Click “Upload Certificate” button to finish uploading the certificate.
Once certificates are uploaded, go back to WebSites and Domains -> Hosting Settings -> Security for the website. Make sure to select “SSL/TLS Support”and “Permanent SEO-Safe 301 redirect from HTTP to HTTPS”. In the certficate dropdown, we will select the SLL we just uploaded.

Select the SSL we just created for the website and click “Apply” button at the bottom.
Now try to open your website and check the certificate validity by clicking the lock icon next to the URL in browser address bar.
This certificate is valid for 90 days and then we need to repeat the same process to renew our certificates. Since we don’t want to use manual challenges every time to renew, we can use crypto keys to authenticate instead. We need one domain key per domain that we can use, and one account key (same for all our domains). Since LE64 generates both these keys, we need to save these files to use next time at the time of renewal. If these files are lost, then also there is no issue. LE64 utility will create fresh domain key and account key for you and you need to go through all steps described above to generate a fresh certificate and install it on your web server.